Wednesday, 4 May 2016


Here's another easy basic soup.
Honestly most soups will have 4-5 ingredients as base with lots of optional things you can add for flavour and other goodness.

This particular one is simple and pretty mellow tasting. The green bean is considered to be "cold" so for sweetness, instead of honey date or logan fruit, I use red dates to balance out the "cold".

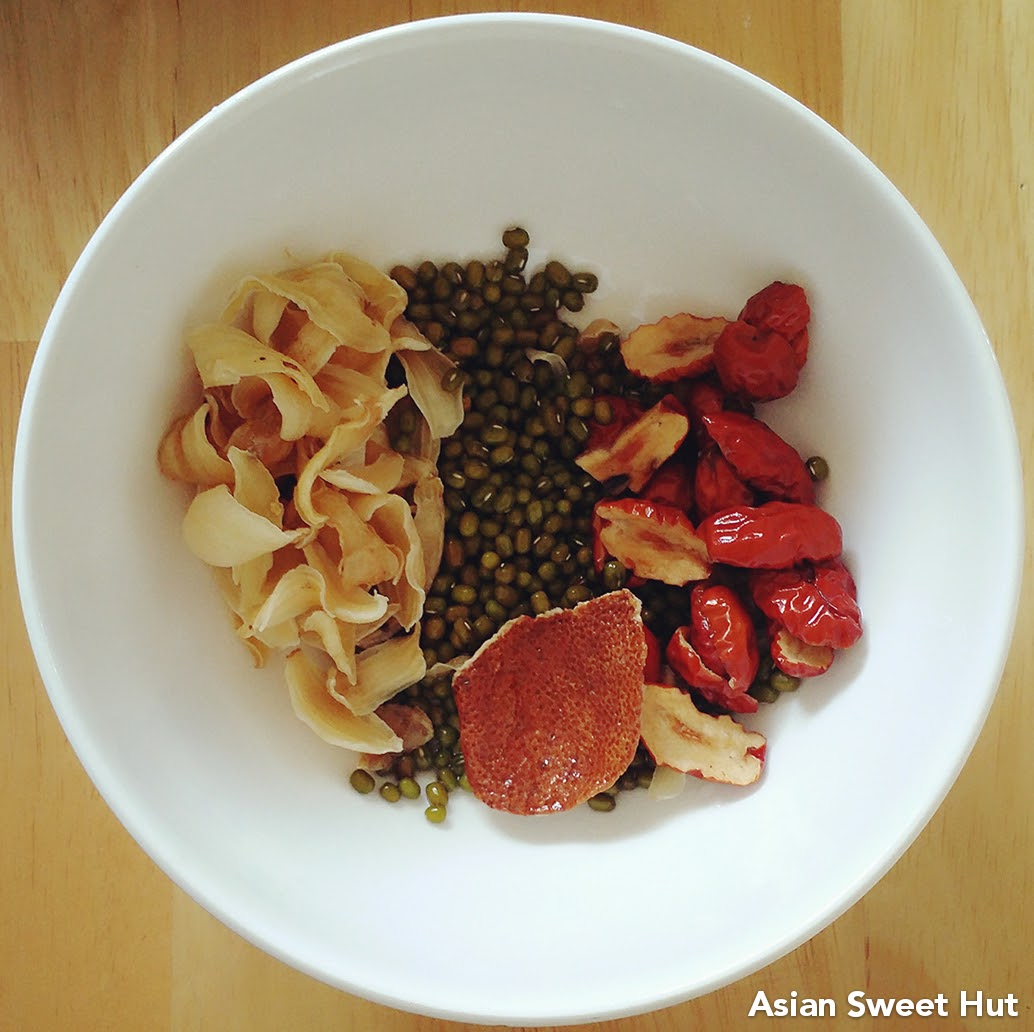
Green Bean, Lily Bulb and Red Date Soup

Ingredients

  • 40g Green Beans
  • 30g Lily Bulb 百合
  • 5 large or 10 small Red Dates 
  • 1 Tangerine Peel 果皮
  • 1 lbs of Pork Bone
  • 4-5 L of water
  • Salt to taste

Directions

  1. If your pork bone is not pre-blanched and you like to have your soup clear, quickly blanch the pork bones in boiling water for 5 mins, then wash the pork bone.
  2. Rinse the green beans, lily bulb and red dates.
  3. Soak the tangerine peel in water and scrap off some of the whites when it's soft.
  4. Heat 4 L of water in a large pot.
  5. Once the water is boiling, add the pork bone.
  6. When it comes back to a rolling boil, add the green beans, lily bulb, red dates and tangerine peel.
  7. Drop the heat down to a soft boil and let it cook for 1.5 hours. Check the soup once in a while to make sure it's still softly boiling to make sure you're not over or under cooking the soup.
  8. At the end of the 1.5 hours, add salt if you wish. Stir and turn off the heat.
  9. Skim the fat and you're good to go.
Enjoy!
Wednesday, 4 May 2016 Agg

Here's another easy basic soup.
Honestly most soups will have 4-5 ingredients as base with lots of optional things you can add for flavour and other goodness.

This particular one is simple and pretty mellow tasting. The green bean is considered to be "cold" so for sweetness, instead of honey date or logan fruit, I use red dates to balance out the "cold".

Green Bean, Lily Bulb and Red Date Soup

Ingredients

  • 40g Green Beans
  • 30g Lily Bulb 百合
  • 5 large or 10 small Red Dates 
  • 1 Tangerine Peel 果皮
  • 1 lbs of Pork Bone
  • 4-5 L of water
  • Salt to taste

Directions

  1. If your pork bone is not pre-blanched and you like to have your soup clear, quickly blanch the pork bones in boiling water for 5 mins, then wash the pork bone.
  2. Rinse the green beans, lily bulb and red dates.
  3. Soak the tangerine peel in water and scrap off some of the whites when it's soft.
  4. Heat 4 L of water in a large pot.
  5. Once the water is boiling, add the pork bone.
  6. When it comes back to a rolling boil, add the green beans, lily bulb, red dates and tangerine peel.
  7. Drop the heat down to a soft boil and let it cook for 1.5 hours. Check the soup once in a while to make sure it's still softly boiling to make sure you're not over or under cooking the soup.
  8. At the end of the 1.5 hours, add salt if you wish. Stir and turn off the heat.
  9. Skim the fat and you're good to go.
Enjoy!

Sunday, 1 May 2016

I swear mother nature loves messing with gardeners up north.
For the last 2 weeks it was in the warm teens, and right after I transplant my sugar snap pea seedling it drops to freezing for several days.... :(
I'm hoping it'll still be ok with the polytunnel to help keep the soil warm enough that the plant will be ok.
I would have liked to wait a little longer before I transplanted it but for the last 2 weeks the peas haven't grown indoors, so I decided to bite the bullet and transplant it now. So fingers crossed for the next week to see how it grows.

Hopefully it will grow better and bear fruit before May two-four weekend. Since sugar snap peas like cooler climate, I was hoping to finish harvesting it by then and swap places with the Chayote which needs warm climate to grow in.

The lettuce I have seeded 2 weeks ago seemed to be doing well before the cold hit.
Cute little seedlings right now. Once again fingers crossed the cold doesn't kill it. When I took a peak again today, seems like a couple of the sprouts are starting to show true leaves :)
The new row of lettuce I seeded last week haven't sprouted yet at all. So maybe the frost killed that row. I'll have to monitor and see before I try to reseed it so I don't overdo that row.

I still struggle with hours of sunlight in the side garden. 3 hours of sunlight is hard on plants.
I think it'll hit peak 4 hours of sunlight in June/July. So those 2 months will be my key growing season.

I better do more indoor seedlings to be ready for it.

I think after this year, I'll probably only do climbing type and lettuce types of plants in the side garden.
Climbing can get a little bit more sun as higher up on the fence gets sun earlier then the ground level.
Lettuce should be ok with partial sun so....that's probably my plan going forward.
If things go well, I'll dig out the trees from the back raised garden and plant there as well for things that need full sun as that patch gets full sun.
Hopefully things will grow yummy enough to convince my husband to help me dig out the trees so I can plant there too :)

Sunday, 1 May 2016 Agg
I swear mother nature loves messing with gardeners up north.
For the last 2 weeks it was in the warm teens, and right after I transplant my sugar snap pea seedling it drops to freezing for several days.... :(
I'm hoping it'll still be ok with the polytunnel to help keep the soil warm enough that the plant will be ok.
I would have liked to wait a little longer before I transplanted it but for the last 2 weeks the peas haven't grown indoors, so I decided to bite the bullet and transplant it now. So fingers crossed for the next week to see how it grows.

Hopefully it will grow better and bear fruit before May two-four weekend. Since sugar snap peas like cooler climate, I was hoping to finish harvesting it by then and swap places with the Chayote which needs warm climate to grow in.

The lettuce I have seeded 2 weeks ago seemed to be doing well before the cold hit.
Cute little seedlings right now. Once again fingers crossed the cold doesn't kill it. When I took a peak again today, seems like a couple of the sprouts are starting to show true leaves :)
The new row of lettuce I seeded last week haven't sprouted yet at all. So maybe the frost killed that row. I'll have to monitor and see before I try to reseed it so I don't overdo that row.

I still struggle with hours of sunlight in the side garden. 3 hours of sunlight is hard on plants.
I think it'll hit peak 4 hours of sunlight in June/July. So those 2 months will be my key growing season.

I better do more indoor seedlings to be ready for it.

I think after this year, I'll probably only do climbing type and lettuce types of plants in the side garden.
Climbing can get a little bit more sun as higher up on the fence gets sun earlier then the ground level.
Lettuce should be ok with partial sun so....that's probably my plan going forward.
If things go well, I'll dig out the trees from the back raised garden and plant there as well for things that need full sun as that patch gets full sun.
Hopefully things will grow yummy enough to convince my husband to help me dig out the trees so I can plant there too :)

Tuesday, 26 April 2016


I had left over celery from making an other dish so I decided to make a stir fry with it.
It's super easy. The most time consuming thing in a stir fry is to cut everything up to the right size. Other then that, heat up your wok and off you go.

Pork celery and shiitake mushroom

Ingredients

  • 300g pork, sliced
  • Half a stalk of celery
  • 4 shiitake mushroom
  • 2 cloves of garlic, minced
  • 1/4 cup of cashew (optional)
  • 1 tbsp splash of rice wine
  • 1/2 tbsp oyster sauce
  • 1 tsp sugar
  • 1/2 tbsp corn starch
  • 1/4 cup water

Directions

  1. Soak the shiitake mushrooms for at least an hour to re-hydrate. Squeeze the water out once it's re-hydrated. 
  2. Slide the pork into thin slices.
  3. Cut the celery into 1 inch pieces. 
  4. Mince the garlic.
  5. Heat up the wok to medium heat.
  6. Add in a bit of oil and the garlic. Stir it around so it doesn't burn.
  7. Add the pork and the shiitake mushrooms and stir it.
  8. When the pork is about 80% cooked, added the celery and quickly stir..
  9. In a bowl mix oyster sauce, sugar, corn starch and water. 
  10. Deglaze the wok with the rice wine.
  11. Make a whole in the middle of the wok and add the sauce mixture.
  12. Once it starts to thicken up and bubble mix turn off the heat and mix everything together. 
  13. Plate and top with cashews.
Tip: during cooking, if more liquid appears in the pan, you might need a little more corn starch. If you do, just add a bit more corn starch to more water and mix it in to thicken the sauce some more.
Tuesday, 26 April 2016 Agg

I had left over celery from making an other dish so I decided to make a stir fry with it.
It's super easy. The most time consuming thing in a stir fry is to cut everything up to the right size. Other then that, heat up your wok and off you go.

Pork celery and shiitake mushroom

Ingredients

  • 300g pork, sliced
  • Half a stalk of celery
  • 4 shiitake mushroom
  • 2 cloves of garlic, minced
  • 1/4 cup of cashew (optional)
  • 1 tbsp splash of rice wine
  • 1/2 tbsp oyster sauce
  • 1 tsp sugar
  • 1/2 tbsp corn starch
  • 1/4 cup water

Directions

  1. Soak the shiitake mushrooms for at least an hour to re-hydrate. Squeeze the water out once it's re-hydrated. 
  2. Slide the pork into thin slices.
  3. Cut the celery into 1 inch pieces. 
  4. Mince the garlic.
  5. Heat up the wok to medium heat.
  6. Add in a bit of oil and the garlic. Stir it around so it doesn't burn.
  7. Add the pork and the shiitake mushrooms and stir it.
  8. When the pork is about 80% cooked, added the celery and quickly stir..
  9. In a bowl mix oyster sauce, sugar, corn starch and water. 
  10. Deglaze the wok with the rice wine.
  11. Make a whole in the middle of the wok and add the sauce mixture.
  12. Once it starts to thicken up and bubble mix turn off the heat and mix everything together. 
  13. Plate and top with cashews.
Tip: during cooking, if more liquid appears in the pan, you might need a little more corn starch. If you do, just add a bit more corn starch to more water and mix it in to thicken the sauce some more.

Friday, 22 April 2016

An other year has past.
What will you be doing for earth day this year?

This year, I'm working from home (saving on commute) and I'll snuggle up with a book instead of watching TV.

The Toronto Green Living Show was last weekend just ahead of earth day this year.


Once again it was a great show. Showcasing healthy living and green living items.

Here are a couple of highlights for me this year.

Highway of Heroes Tribute - Great initiative to plant trees for every fallen Canadian coldier since Confederation along the stretch of highway between CFB Trenton to Toronto. Definitely go check out their website and facebook to monitor their progress. It's a 5 year project so lots of time to get involved! They're pretty full for Spring planting already. If you would like to get involve, fall is their next target.

Dalcini Stainless - Stainless steel tupperware. I was really hoping they would have double walled products as that's something I've been looking for but that's currently in design. They currently have single walled products which is great for cold items for kids to pack their lunch in. I'm keeping my eye on them for the doublewalled products that can keep food warm.


Harmony Organic - This year I had a chance to chat with the people at the booth at Harmony Organics to understand more about their farm practices, the feed they use, the lifestyle of their cows. It's great to know that their feed practice is very similar to Rolling Meadows where the cows are grass fed above 90% of their feed. Very little of it is grain. I like the fact that they have 4L bags, I'll be looking out for that. Oh the the glass bottle, it can be returned for refund on the bottle as it's reusable! I haven't seen that in so long, better then plastic but I like buying in bulk :(

Green space brands - So I found out that Rolling Meadows was only 1 of the brands under an umbrella of them. Their booth this year sampled the rolling yogurt and kefir. The life choices foods all beef hot dogs and their breaded chicken. And nudge foods Mac and Cheese made with their Rolling Meadow's 1% milk.
Their yogurt was so yummy even without anything added to it. I'm pretty use to plain yogurt being sour, but I was surprised this one wasn't as sour and if you really concentrate you can even find a sweetness to it. The only thing in the ingredients list is milk and bacteria culture like it's suppose to be. And honestly it's only $3.99 at full price which seems really reasonable when I look at the cost of other organic brands. I will definitely be switching over to this yogurt and add my own fruits. The hot dogs and the breaded chicken was very tasty as well. I was surprised at how moist the chicken was. If you're looking for alternative products for all those processed food you remember growing up with, I think this is a great choice

Alveole - Very very local honey from bees. They're from Montreal but have started expanding their network. They had brought honey from Montreal for the show and it was very interesting how you can actually taste the difference in the honey based on the location it was harvested at. Honey from hives in different parts of Montreal taste different just because of the flowers around there. If I had a lot of land, I would consider putting a beehive around me so I can get honey from local flowers and hopefully build up against my allergies. But as it is, I'm pretty sure my neighbours would not be happy with me if I put a beehive in my backyard. I guess I'll just have to look for a local farmer for my honey :)

This year I didn't find any booths giving out seeds or promoting seed saving which I was surprised at. The only place that had a booth with Toronto Master Garderner there gave away little cups of soil with a flower seed planted. But Urban Harvest was there again. Great to see them there.

Once again I spent a good half a day at the show. Lots of good stuff. Lots of fun. Totally encourage everyone to go to check things out next year to just learn more and get more ideas.

Friday, 22 April 2016 Agg
An other year has past.
What will you be doing for earth day this year?

This year, I'm working from home (saving on commute) and I'll snuggle up with a book instead of watching TV.

The Toronto Green Living Show was last weekend just ahead of earth day this year.


Once again it was a great show. Showcasing healthy living and green living items.

Here are a couple of highlights for me this year.

Highway of Heroes Tribute - Great initiative to plant trees for every fallen Canadian coldier since Confederation along the stretch of highway between CFB Trenton to Toronto. Definitely go check out their website and facebook to monitor their progress. It's a 5 year project so lots of time to get involved! They're pretty full for Spring planting already. If you would like to get involve, fall is their next target.

Dalcini Stainless - Stainless steel tupperware. I was really hoping they would have double walled products as that's something I've been looking for but that's currently in design. They currently have single walled products which is great for cold items for kids to pack their lunch in. I'm keeping my eye on them for the doublewalled products that can keep food warm.


Harmony Organic - This year I had a chance to chat with the people at the booth at Harmony Organics to understand more about their farm practices, the feed they use, the lifestyle of their cows. It's great to know that their feed practice is very similar to Rolling Meadows where the cows are grass fed above 90% of their feed. Very little of it is grain. I like the fact that they have 4L bags, I'll be looking out for that. Oh the the glass bottle, it can be returned for refund on the bottle as it's reusable! I haven't seen that in so long, better then plastic but I like buying in bulk :(

Green space brands - So I found out that Rolling Meadows was only 1 of the brands under an umbrella of them. Their booth this year sampled the rolling yogurt and kefir. The life choices foods all beef hot dogs and their breaded chicken. And nudge foods Mac and Cheese made with their Rolling Meadow's 1% milk.
Their yogurt was so yummy even without anything added to it. I'm pretty use to plain yogurt being sour, but I was surprised this one wasn't as sour and if you really concentrate you can even find a sweetness to it. The only thing in the ingredients list is milk and bacteria culture like it's suppose to be. And honestly it's only $3.99 at full price which seems really reasonable when I look at the cost of other organic brands. I will definitely be switching over to this yogurt and add my own fruits. The hot dogs and the breaded chicken was very tasty as well. I was surprised at how moist the chicken was. If you're looking for alternative products for all those processed food you remember growing up with, I think this is a great choice

Alveole - Very very local honey from bees. They're from Montreal but have started expanding their network. They had brought honey from Montreal for the show and it was very interesting how you can actually taste the difference in the honey based on the location it was harvested at. Honey from hives in different parts of Montreal taste different just because of the flowers around there. If I had a lot of land, I would consider putting a beehive around me so I can get honey from local flowers and hopefully build up against my allergies. But as it is, I'm pretty sure my neighbours would not be happy with me if I put a beehive in my backyard. I guess I'll just have to look for a local farmer for my honey :)

This year I didn't find any booths giving out seeds or promoting seed saving which I was surprised at. The only place that had a booth with Toronto Master Garderner there gave away little cups of soil with a flower seed planted. But Urban Harvest was there again. Great to see them there.

Once again I spent a good half a day at the show. Lots of good stuff. Lots of fun. Totally encourage everyone to go to check things out next year to just learn more and get more ideas.

Tuesday, 19 April 2016


This recipe is inspired by Just Bento's cabbage rolls.
Usually the napa cabbage I buy are so big that I usually make giant cabbage rolls, but i found that if I cut the cabbage in half, I can make smaller 2 bite rolls.

For this roll, I make a dumpling like filling with shiitake mushrooms, dried scallops and mini dried shrimp. Asian flavours for an Asian cabbage roll.

Napa Cabbage Rolls

Ingredients 

  • 6 Short (and fat) napa cabbage leaves, cut in half for 12 or 12 small leaves
  • 300g Ground pork
  • 3 Shiitake mushrooms
  • 1 big dried scallop or 2 small ones
  • 1 tbsp mini dried shrimp
  • 1/2 tsp sugar
  • 1 tbsp low sodium soy sauce
  • 1 tsp corn starch

Directions

  1. Soak the shiitake mushrooms and dried scallop for several hours to re-hydrate. If you do not have several hours, soak in warm water to hasten the process. 
  2. If the cabbage leaves you're using is really wide, you can cut it in half down to middle to make it skinnier. But make sure you can still wrap it around the meat when it's cut in half.
  3. Do a quick blanch of the leaves to soften them.
  4. Once the mushroom is re-hydrated, cut into small pieces and add it into a bowl with the meat.
  5. Shred the dried scallop and add it into the bowl with the meat and mushrooms
  6. Rinse the dried shrimp and lightly chop it into smaller pieces, add it into the bowl.
  7. Add the sugar, soy sauce and corn starch into the bowl and mix all together.
  8. Once it's all mix, spoon the mixture onto the soften napa cabbage leaves and roll.
  9. Tuck the tail of the cabbage into one of the sides.
  10. Your rolls should have a diameter of about 1 inch so it's a bite size roll. 
  11. Steam in a dish for 15 mins and you're ready to go!
Tuesday, 19 April 2016 Agg


This recipe is inspired by Just Bento's cabbage rolls.
Usually the napa cabbage I buy are so big that I usually make giant cabbage rolls, but i found that if I cut the cabbage in half, I can make smaller 2 bite rolls.

For this roll, I make a dumpling like filling with shiitake mushrooms, dried scallops and mini dried shrimp. Asian flavours for an Asian cabbage roll.

Napa Cabbage Rolls

Ingredients 

  • 6 Short (and fat) napa cabbage leaves, cut in half for 12 or 12 small leaves
  • 300g Ground pork
  • 3 Shiitake mushrooms
  • 1 big dried scallop or 2 small ones
  • 1 tbsp mini dried shrimp
  • 1/2 tsp sugar
  • 1 tbsp low sodium soy sauce
  • 1 tsp corn starch

Directions

  1. Soak the shiitake mushrooms and dried scallop for several hours to re-hydrate. If you do not have several hours, soak in warm water to hasten the process. 
  2. If the cabbage leaves you're using is really wide, you can cut it in half down to middle to make it skinnier. But make sure you can still wrap it around the meat when it's cut in half.
  3. Do a quick blanch of the leaves to soften them.
  4. Once the mushroom is re-hydrated, cut into small pieces and add it into a bowl with the meat.
  5. Shred the dried scallop and add it into the bowl with the meat and mushrooms
  6. Rinse the dried shrimp and lightly chop it into smaller pieces, add it into the bowl.
  7. Add the sugar, soy sauce and corn starch into the bowl and mix all together.
  8. Once it's all mix, spoon the mixture onto the soften napa cabbage leaves and roll.
  9. Tuck the tail of the cabbage into one of the sides.
  10. Your rolls should have a diameter of about 1 inch so it's a bite size roll. 
  11. Steam in a dish for 15 mins and you're ready to go!

Friday, 15 April 2016

These past couple of weeks starting seedlings and setting up my garden takes me on a trip down memory lane.
I remember when I was young, the most important thing when we were looking for a house in Canada was having a garden because that was what my grandpa really wanted to do when he moved over from HK.

He loved gardening and would spend hours in the garden every day.
Of course he planted all Chinese veggies which takes a lot of room and lower yield, so it was always special on nights we eat veggies from the garden.

He grew bak choy, choy sum, winter melon, fuzzy melon, Chinese chives, peppers and tomatoes.
I remember he let me plant a strawberry plant from school one year and not only did we never get to eat the strawberries because animals came and ate them, but it took over his garden so he eventually removed it.

I loved the melons he grew and would like to grow it too but sadly I don't get enough sunlight in my side yard (west side of house).

So this year, being the first year I'm gardening, I decided to try to stick with easy things that can potentially grow in with less light

I'm hoping to be able direct sow lettuce and transplant some items next week as the weather is starting to warm up.
Right now it's still less then 10 degrees C and it goes to about 0 degrees at night so I'm hoping with the mini-hoop up, the soil can get to around 15 degrees C by next week.

So to get ready, I've started my seedlings 2 weeks ago. Funny thing is, the bigger pot on the bottom left has 4 seedlings growing but I only put 2 seeds in that pot. So I have no idea what else is growing in there....and I don't know what to pull because I don't know what is what....I guess I'll just have to wait until they grow bigger :(

The sugar snap pea on the bottom left is growing very well right now. It should be ready to transplant next week and good news is that it can survive with only 4 hours of sunlight, which is about what I get in the side garden.

So in the pots, I have broccoli di ciccio, cabbage "green express" and sugar snap pea started.

Today I direct sow 1 line of Purple Plum Radish and I started soaking a blue jay bean, a slenderette bean and and Orca bean. I'm a little hesitant to plant these because they're all bush type and require 6-8 hours of sun. I hope they'll still be ok even if it's slightly lower yield. One key reason why I'm planting them is because they can help pull nitrogen into the soil and I'm trying to make the soil richer anyway I can.

Next week I hope to get more things in the ground so I can start harvesting as soon as the end of May or early June :)

Friday, 15 April 2016 Agg
These past couple of weeks starting seedlings and setting up my garden takes me on a trip down memory lane.
I remember when I was young, the most important thing when we were looking for a house in Canada was having a garden because that was what my grandpa really wanted to do when he moved over from HK.

He loved gardening and would spend hours in the garden every day.
Of course he planted all Chinese veggies which takes a lot of room and lower yield, so it was always special on nights we eat veggies from the garden.

He grew bak choy, choy sum, winter melon, fuzzy melon, Chinese chives, peppers and tomatoes.
I remember he let me plant a strawberry plant from school one year and not only did we never get to eat the strawberries because animals came and ate them, but it took over his garden so he eventually removed it.

I loved the melons he grew and would like to grow it too but sadly I don't get enough sunlight in my side yard (west side of house).

So this year, being the first year I'm gardening, I decided to try to stick with easy things that can potentially grow in with less light

I'm hoping to be able direct sow lettuce and transplant some items next week as the weather is starting to warm up.
Right now it's still less then 10 degrees C and it goes to about 0 degrees at night so I'm hoping with the mini-hoop up, the soil can get to around 15 degrees C by next week.

So to get ready, I've started my seedlings 2 weeks ago. Funny thing is, the bigger pot on the bottom left has 4 seedlings growing but I only put 2 seeds in that pot. So I have no idea what else is growing in there....and I don't know what to pull because I don't know what is what....I guess I'll just have to wait until they grow bigger :(

The sugar snap pea on the bottom left is growing very well right now. It should be ready to transplant next week and good news is that it can survive with only 4 hours of sunlight, which is about what I get in the side garden.

So in the pots, I have broccoli di ciccio, cabbage "green express" and sugar snap pea started.

Today I direct sow 1 line of Purple Plum Radish and I started soaking a blue jay bean, a slenderette bean and and Orca bean. I'm a little hesitant to plant these because they're all bush type and require 6-8 hours of sun. I hope they'll still be ok even if it's slightly lower yield. One key reason why I'm planting them is because they can help pull nitrogen into the soil and I'm trying to make the soil richer anyway I can.

Next week I hope to get more things in the ground so I can start harvesting as soon as the end of May or early June :)

Thursday, 14 April 2016


Ah the versatile fish paste. I personally like it best pan fried as it's much tastier but if you want a fast meal, scooping it into boiling water is the fastest way to cook it.

You can use existing chicken stock and cooked rice to make this congee in 10 mins.
However in the recipe below, I'll be using a chicken shell and uncooked rice which will result in longer cooking time.
It's really fast to put together but you'll need a bit of time to let it simmer. 

Congee with Fish Paste

Ingredient

  • 2 to 3.5L of water
  • 1.5 rice cooker cup of frozen rice
  • 1 chicken shell
  • 3 slices of ginger
  • 1 tub of fish paste
  • 1 green onion
  • 2 tsp salt

Directions

  1. Add 2 L of water to the pot and bring to a boil.
  2. Add the Chicken shell and ginger and let it simmer for 15 mins. 
  3. Add the frozen rice.
  4. Bring the pot back up to a boil and then simmer for 20 mins.
  5. Now that the base of the congee is cooked, you can add in the fish paste. Easy way is to use a spoon and scoop out little balls and dip your spoon into the congee so it releases from the spoon. If you want it prettier, you can try to cut it but you will probably want to freeze it before hand so you can cut it. It's pretty soft and malleable so hard to cut if you don't freeze it.
  6. Let it cook until all the fish paste floats to the top to signifies that it's cooked.
  7. Add the salt and stir.
  8. Chop the green onions to be used as topping for your congee after you scooped it into bowls for serving.
Enjoy :)

Thursday, 14 April 2016 Agg

Ah the versatile fish paste. I personally like it best pan fried as it's much tastier but if you want a fast meal, scooping it into boiling water is the fastest way to cook it.

You can use existing chicken stock and cooked rice to make this congee in 10 mins.
However in the recipe below, I'll be using a chicken shell and uncooked rice which will result in longer cooking time.
It's really fast to put together but you'll need a bit of time to let it simmer. 

Congee with Fish Paste

Ingredient

  • 2 to 3.5L of water
  • 1.5 rice cooker cup of frozen rice
  • 1 chicken shell
  • 3 slices of ginger
  • 1 tub of fish paste
  • 1 green onion
  • 2 tsp salt

Directions

  1. Add 2 L of water to the pot and bring to a boil.
  2. Add the Chicken shell and ginger and let it simmer for 15 mins. 
  3. Add the frozen rice.
  4. Bring the pot back up to a boil and then simmer for 20 mins.
  5. Now that the base of the congee is cooked, you can add in the fish paste. Easy way is to use a spoon and scoop out little balls and dip your spoon into the congee so it releases from the spoon. If you want it prettier, you can try to cut it but you will probably want to freeze it before hand so you can cut it. It's pretty soft and malleable so hard to cut if you don't freeze it.
  6. Let it cook until all the fish paste floats to the top to signifies that it's cooked.
  7. Add the salt and stir.
  8. Chop the green onions to be used as topping for your congee after you scooped it into bowls for serving.
Enjoy :)